Showing posts with label Soap Articles. Show all posts

Sunday, July 22, 2018

DIY medieval hard white soap.


Castile soap – a well-known olive oil soap with a long-time history, it is named for the city it reportedly originated. Originally made from unfiltered olive oil and lye produced from burning the plant barilla, castile soap still has an all-natural reputation and is perfect for vegetarians and vegans as it is made of vegetable oils only. While in Spain castile soap means soap made in the Castilla area from 100% olive oil, in modern times the term ‘castile’ can have other meanings. Commercially available Castile soaps are often a blend of olive oil with coconut and palm oils, and here castile indicates the bulk of the oils comes from olives. The term castile is also used to indicate vegetable oils-only soaps, and even slightly viscous liquid soap made only with vegetable oil.
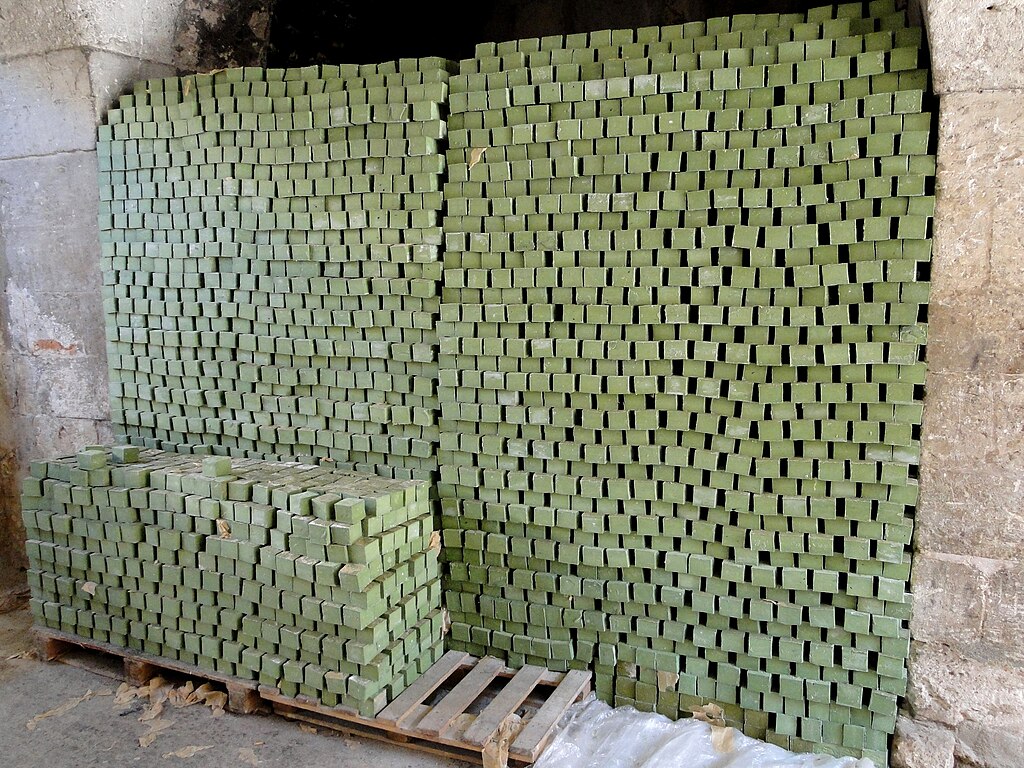
Aleppo soap 03.jpg
Aleppo soap at the Al-Jebeili factory, Aleppo, Syria (Creative Commons)

Most people are familiar with the solid bar olive oil soap and some might even know its Spanish roots. But did you know that another soap made from only olive oil, called simply ‘white soap,’ originated in Northern Italy hundreds of years before castile soap appeared in Spain? And the European claim is not even as old as the even older more fabled source – Aleppo soap, made of olive and laurel berry oils. This hard soap originated in the city of Aleppo and goes back at least a thousand years; as well as its cousin Nabulsi soap, made in Nablus, Palestine. It is generally thought that the invading ‘Moors’ of North Africa brought the technology of making hard white soap with them to medieval Southern Europe. With the prevalence of the plant barilla in Southern Europe - an essential ingredient in the making of hard soap - the craft of hard soap making was quickly picked up by the Europeans and evolved into lucrative local soap making centers, like in Castilla, Spain and in Marseilles, France.

Why go through the trouble of making your own soap?
Not all soaps are made alike and unless you know what went in it many olive oil soaps might not be as healthy as you would wish. There are different grades of olive oil, depending on how it is processed. They all work for making soap, though I would advice to stay away from pomace olive oil. While this is cheapest, there is a reason! Pomace means that it is made of the solid remains of the olive including skins, pulp, seeds, and stems, and the amount of oil left is so minimal that it cannot be extracted by pressing, but only through the combined use of chemical solvents and extremely high heat. Cheap filler oils like canola and palm oil are also often included in modern castile soaps. In the case of palm oil: unless it is certified organic and sustainably farmed, I do not use it as standard production attributes to rainforest deforestation. Olive oil-only soaps are readily available from artisanal soap makers but sometimes it’s easier – and a lot more fun – to just go ahead and make your own!

Why make soap in a soda bottle?
The exothermic or heat creating reaction of dissolving lye crystals into water heats the water to (near) boiling and creates a lot of very dangerous caustic steam. Experienced soap makers learn how to work around this, either by making lye outdoors (and being upwind ourselves), by using (partially) frozen liquid, or by using ventilation. The soda bottle method keeps the steam contained as we wait for it to cool down and condense again. Steam, as it is a water vapor, or gas, takes up more room than liquid water, and in a confined area like a bottle will build up pressure. Soda bottles are designed to take this pressure, as long as there is enough space left in the bottle to do so. Using this technique anyone can make small amounts of hard soap without the need for specialized equipment. But do always keep your wits about, as lye will always be a potentially dangerous chemical.

 
Measuring out the lye, the soap bottle and the water are at the ready.
 
Measured the oil.
Needed:
- 2 liter soda pop bottle, with lid.
- 5 gallon bucket
- Lye
- Water
- Ice cubes
- Olive oil
- Funnels (one for water, one for lye)
- Rubber spatula
- Scale, preferably digital.
- Paper Towels
- Household vinegar
- Rubber gloves
- Safety glasses

About the bottle:
PET (polyethylene terephthalate) bottles are not specifically made for extreme temperatures; they are made to withstand pressure very well, and are easy to get as 2 liter soda pop bottles. PET plastic should not contain BPA but might contain traces due to the (recycled) manufacturing process. BPA is not food safe but only releases slowly from contaminated plastic under high temperatures, and while the lye creates high temperatures, it does so only for a short while.  To minimize heat, a bucket with ice water should be at the ready before mixing the lye water.

Do NOT OVERFILL the bottle. Stick to the recommended minimal amount of oil and lye. The empty space in the bottle is needed as a pressure chamber for heat expansion. The exothermic (heat creating) reaction of dissolving lye in water, heats the water to boiling and creates lots of steam. This steam is highly caustic and VERY dangerous, hence the closed-off bottle pressure chamber.

About the lye:
Up until recently, lye would be available in the household cleaning isle of the supermarket and hardware store. Alas, as it is used to make certain other stuff, this is no more. Do not buy liquid lye to make soap, as it is not possible to measure the amount of dissolved lye correctly, plus, there are additives added you do not want in your soap. Food grade lye can be bought over the internet and I get mine from here: http://essentialdepot.com/

About Safety:
When working with sodium hydroxide lye ALWAYS wear SAFETY GLASSES. It is recommended to wear gloves, and always have household vinegar nearby for the unexpected splash or droplet. Wear closed shoes and long sleeves if possible.

For a nice amount of hard soap for personal use a 10 ounce olive oil batch works well.

Step by step:

  • Measure 10 weight ounces of (room temperature) olive oil.
  • Measure 1.26 ounces of lye.
  • Measure 2 ounces of cold water.

- Fill a 5 gallon bucket with a water and ice mixture.
- Add water to soda bottle with funnel.
- Slowly but steadily add lye crystals to water in bottle with the other dry funnel.
- When done, close lid immediately, and shake gently.
- Stick into ice-water right away when all the lye is dissolved.
- The bottle will start to fill with steam, get scorching hot and swell. Do not touch at the bottom! It should already be in the ice-water.
- After about 5-10 minutes check bottle.
- If the bottle’s bottom shrank, it could benefit from ice-water a little quicker next time.
- The steam should be condensing on the sides and run down in droplets.

 Water droplets condensing on the sides.

A slightly overheated shrunken soap bottle bottom.

- When the bottom of the bottle, with the liquid, feels not cold nor warm (body temperature, also called blood warm) it is time.
- Open bottle cap, and add oil to blood warm lye.

Oil sitting on top of lye water.

      All mixed up by shaking.

- And now it’s time to shake your booty! Do put the cap back on first.
- Shake, shake, and shake some more…
- When the soap starts to stick and coat the sides of the bottle like custard, it is good.

Raw soap at the ‘custard’ stage.

If you like, this is the moment you can pour the soap into a mold, or into a small water bottle to make soap rounds (for instance to make felted soap). Remove the top of the bottle first, and use a rubber spatula to get it all out.


If you do not intend to mold, remove the lid, set it somewhere safe and let it sit open until the sides of the soap are totally firm. Cut off the top of the bottle, and pop out your block of soap!

Cut your soap to size in a week or so (do not wait too long, olive soap is notorious for getting crumbly) Let the pieces dry on a cookie drying rack in a cool and dark place for a minimum of three weeks.

Tip: you can let the soap dry completely in the bottle, but make sure to remove the lid. If dried in a (partially) closed environment the soap can ‘sweat’ a little – this will either go away on its own, or you can dab it dry later with a paper towel.

As with all hand made soap, when in use place the soap on a draining soap dish to let dry in between uses and it will go a long way - a green Scotchbrite pad cut in half makes a fabulous cheap soap dish. As has been said: the longer it sits, the harder it gets, and the longer it stays!


References:
Dunn, Kevin. Caveman Chemistry. Universal Publishers, 2003.
Dunn, Kevin. Scientific Soapmaking. Farmville, VA: Clavicula Press, 2010 (p.58)

About the safety of using plastic bottles:

About castile soap in general:

Creative Commons image;

Tuesday, November 15, 2016

Make Soap the Old-Fashioned Way

Learn how to make your own lye from ashes, and then 
use it to cook up a mild, soft soap perfect for personal use.

By Susan Verberg

Soap-makers love to tell the story of how ancient Romans first “discovered” soap by burning animal sacrifices on Mount Sapo, and how the creeks at the bottom of that mythological mountain were the best places to do laundry. They’ll tell you that the water, ash and animal fat on those sites accidentally created the soap that filled the creeks. The reality is that the Romans didn’t actually make soap. They traded for it with the Celts, who dominated the market because of their access to abundant limestone and seashells [writer's note: this would be access to marine plants for soda ash as opposed to potash, not limestone which is calcium oxide], from which they produced slaked lime [soda ash] to make a caustic soda lye (sodium hydroxide).

After years of professionally making all-natural goat’s milk soaps to sell at our local farmers market, I decided to develop a self-sufficient soap-making process based on ancient techniques. My goals were to make my own lye and to turn kitchen-waste fats into soap. I finally took the plunge… and what an interesting adventure it became! I dug through old articles and manuscripts, learned to decipher medieval English, and filled my kitchen with weird, bubbling concoctions. And I wondered how something that seemed so simple could be so challenging.

Don’t let me discourage you. If you’re an outdoor enthusiast, you may have made soap already. Scrubbing a greasy frying pan with campfire ashes doesn’t just scour the dirt away: when rinsed with a little water, the hydroxide salts in the ashes combine with the cooking grease to form a primitive cleanser.

Understanding Soap-Making Basic
To undertake the process of soap making, known as saponification” (from sapo, the Latin word for soap), let’s first review what soap is and why it works the way it does. Because soap is made from water-soluble bases known as alkalis, it neutralizes acids while retaining its ability to be dissolved in water. More specifically, soap is a surfactant with the unusual ability to diffuse fats and oils into water, which is why it can rinse away oily stains.

Soap is made by mixing dissolved hydroxide salts, generally called “lye”, with fatty acids. To make your own lye that you can use to produce a soft soap, you leach (or drip) water through ashes to dissolve the hydroxide salts. Ashes are highly concentrated minerals of hydroxides, nitrates, carbonates, sulfites, and more. The quality of the lye produced depends on how well the plant material was burned. I’ve found that the more complete the burn (all organic material combusted), the more hydroxides will be dissolved, and the more basic (that is, higher pH) the resulting lye will be. In the case of incomplete burns, such as you’d find in fire pits and fireplaces, you can add lime to help change the carbonates (charcoal) into hydroxides.

My drip lye made from ashes has a pH of about 11, while commercial lye has a pH of 14 – making it 1,000 times more basic than ash lye. This is a big reason why making drip-lye soap is so different from conventional soap making. Because of the lower pH, drip lye is a lot less dangerous to handle than modern commercial lye. As a precaution, though, you should always keep some vinegar handy during soap making because its acid will help neutralize the lye’s base.

Making soap using drip lye can be challenging because the purity, density, and consistency of home made lye is uneven. For home soapmakers, I recommend preparing hot-process soap (which I describe below) rather than cold-process because an exact amount or specific purity of lye isn’t required for successful saponification. In hot-process soaps, saponification – the chemical reaction between lye and fat – is controlled by added heat, not by the pH.

During my research, I uncovered a historic trick for checking the density of drip-ash lye using a fresh egg. Because an egg has about the same density as lye that’s the correct strength, the egg will float. Many colonial recipes for drip-ash lye recommend using homemade lye if it can float an egg with ¼ of its shell showing about the liquid. This lye will produce “Black Soap”, a strong laundry soap that historical re-enactors complain is too harsh. On the other hand, I uncovered a 16th century shampoo recipe that recommends using lye dense enough to suspend an egg in the middle of the liquid. Suspended-egg lye makes near-neutral soap, perfect for personal use because it does not “bite”. This same historic recipe also confirms the 3-to-1 ratio of lye to fat that consistently works for me: “thre pottels of lye to one pot of oyl”. It’s nice to find confirmation that’s five centuries old!

Based on experience and historical research, I’ve developed these instructions for making a soft, creamy, hot-process soap from scratch – including homemade lye.


Soft Soap in 8 Steps
1 - To make a leaching barrel, drill a small hole at the bottom of a 5-gallon bucket and stuff it with a piece of dishcloth as a filter. Fill the bucket with sieved ashes, tamping down intermittently. Level the top, leaving about 2 inches of headroom. Slowly pour in about an inch of rainwater. When the water has absorbed, add about an inch more. Continue to slowly add water until liquid starts to drip out the hole in the bottom of the bucket – it should take about a day. Prop the ash bucket on top of a second bucket to collect this drip lye. (Or build a setup like in the illustration at the left.) You’re ready to test the strength when you’ve collected about 1 gallon.


2 – If you’ve used regular ashes from a woodstove or fireplace in Step 1, the drip lye will be dark brown and probably won’t suspend an egg. Slowly heat the the drip lye and allow it to evaporate until it has the desired strength, which is likely to about a quarter of its original volume. Use stainless steel vessels for heating lye, never aluminum (which creates noxious gases in combination with lye) or enamel (which lye will etch). Cool down the lye before soap making. Contaminants will settle to the bottom. The next day, pour the purer lye solution off the top (that is, decant it). If you’ve used white ashes from a high-efficiency stove in Step 1, the lye may be light yellow and will float an egg from the get-go. Use this lye as is to make a strong, sharp laundry soap. To make neutral hand soap, slowly add water in small amounts until the egg is suspended in the solution.


 3 – Measure out (by liquid volume) 3 parts lye to 1 part oil. Fats that are solid at room temperature, such as tallow and lard, should be heated until they liquefy, and then cooled. If you’re a soap-maker beginner, use olive oil because the process will be easier. Add the lye to the oil and mix well – a stick blender works great – and let sit overnight.


 4 – After 12 hours rest, the solution will have separated. Mix it very well. Heat the solution for an hour or two in a slow cooker on the high setting with the lid in place. Stir only occasionally, as the soap should not be allowed to cool down. When the soap starts to rise, you’ll see foam forming under the lid. Remove the lid, and stir the soap well to settle the foam. Replace the lid, but prop a toothpick under the lid to create a little gap for hot air to escape.


5 – As the soap cooks in the slow cooker (still on the high setting), you’ll see bubbles form at the edge of the ceramic insert. This is the soap “turning itself”. It should only bubble at the edges – never boil in the center. You’ll observe finished soap starting to form on top. Stir occasionally to ensure that no areas dry out at the edges of the insert. Be sure to stir gently, because the mixture can foam up suddenly at this stage.

6 – The soap will get thicker and thicker until it incorporates, or finishes. Remove the slow cooker’s lid so excess moisture can evaporate. This soap will look like custard (soap-makers call this “trace”), leave droplet marks (“trace marks”) on the surface when scooped and drip off the spoon in globs. You’re nearly finished!


7 – Cook until it starts to have a glazed, sleek look, like petroleum jelly, and leaves little wavy points when stirred. If you part the soap at the bottom of the cooker, it should not come back together. Stop cooking at this point for a thin, soft soap. Or, keep evaporating the moisture until the soap is your desired density – it will never get hard. I prefer a whipped cream consistency.


8 – Your finished product will vary by color and consistency. I’ve made successful batches of soap using “old-fashioned” techniques and each one takes about six to seven hours. If you decide to try this process over open heat, be aware that a more erratic heat sources will make the soap behave erratically as well, and your mixture may not come to trace.

Making soap from homemade drip lye is a fun and rewarding project, and one that doesn’t require specialized or expensive equipment. I hope you’ll give it a try!

Susan Verberg is the founder of Far Mountain Soap in Ithaca, New York. Find her handmade soaps at www.FarMountainFarm.Blogspot.com

From the December 2016/January 2017 Mother Earth News issue, page 40-42.

Monday, November 14, 2016

Mother Earth News published my soft soap article on p40-42, Dec 2016 issue

Make Soap the Old-Fashioned Way, published in the December 2016 issue of Mother Earth News (and available on newsstands shortly...):


For the complete article, with errata, you can check
https://www.academia.edu/31075422/Make_Soap_the_Old-Fashioned_Way._Mother_Earth_News_Dec_2016_Jan_2017

For a more complete picture of the process and chemistry involved you can download the research papers and handouts this article is based on from https://independent.academia.edu/susanverberg

And thank you all for your interest and continued support!

Wednesday, August 17, 2016

Tell a Tale of Soap Making, Pocket Full of Lye

 From the Pennsic Independent August 10, A.S.LI (2016CE), by Catella of Cilicia.


Apart from some technical inconsistencies, this article is an enjoyable read, and the activities were even more fun in person! I especially loved meeting Duke Gavin and hanging around his campfire, watching the soap cook, very very slowly, and hear all the stories bubble up...